

This post walks through how to use GitHub as CfCT’s source of truth for template updates and AWS account/environment management.
CfCT’s Configuration Source
CfCT needs some location to serve as its “configuration source”…it’s source of truth. In this previous post, I stated that I was going to create a GitHub repository that would contain the CloudFormation templates, parameter files, and manifest.yaml configuration file required by CfCT. The configuration source is simply used to define what you want CfCT to deploy. Much has changed since my first CfCT article was published on November 19th, and GitHub is not the only configuration source option. I suspect that many beneficial changes will be announced this week, though maybe not so much for CfCT…enjoy re:Invent if you happen to be there!
Anyway, on November 24th, AWS decided to resurrect CodeCommit, so now you have a grand total of 3 “official” choices for your CfCT configuration source:
- S3
- CodeCommit
- GitHub
For the purposes of this series, I will use GitHub to support a GitOps-style workflow. Now however, if you want a GitOps-style workflow without using external services, you can select CodeCommit. If you don’t care about Git workflows, have little or no Git or coding experience on your team, and would prefer to simply upload ZIP files to an S3 bucket to trigger pipeline runs, S3 may be your choice.
Personally, If I had to do it all over again, I’d still pick GitHub. Why? I got tired of running the pipeline, just to discover file or configuration errors. So, I created workflows to run configuration checks to identify issues before triggering the CfCT pipeline. Though I still had some headaches as I figured out the “best” workflow (there’s probably some more tweaks to make), I believe this approach will ultimately save time and decrease frustration! Instead of waiting through a pipeline run to catch an error, I was able to identify them early, fix them, and then trigger the pipeline. Overall, I believe the workflow have been a time and sanity saver, helping me to deploy faster by avoiding potentially long waits for minor mistakes.
I’m sure there’s a way to replicate GitHub workflows using some combination of CodePipeline, CodeBuild, EventBridge, IAM roles, CloudWatch Logs, Lambda functions, and other AWS services, but I didn’t, and still don’t, have the desire to figure that out. If you do, please publish that blog, and I’ll check it out.
Deploying CfCT with GitHub as the Configuration Source
AWS provides decent documentation for the deployment scenario here, so I won’t necessarily deep dive into the steps as much as I’ll provide some commentary about them. The process has three steps:
- Create a GitHub repository
- Create the Developer Tools – GitHub connection
- Deploy the CfCT CloudFormation stack
Create a GitHub repository
I’m going to assume you know how to create a GitHub repo but I just want to point out a few things things.
- First, in this instance, I created a private repo. Maybe you create a public one later to share a basic CfCT structure/deploy setup but for your actual data, create a private repo.
- Second, CfCT defaults to “watching” the main branch. You merge a PR to main, the CfCT pipeline runs. It doesn’t have to be this way, it can be any branch you want. Whatever that branch is, you’ll need to create it and then specify it when deploying CfCT. I used the main branch.
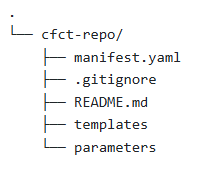
- The third, learned by trial and error, is that on my initial commit to main, I’d include a “blank” manifest.yaml file. Within my first commit to main, I included a README, .gitignore, and a Templates and Parameters directory. This isn’t a huge deal, but if a proper manifest.yaml file is not present in the repo, you’ll get a pipeline error on the initial run.
A blank manifest.yaml file that does not deploy any resources would be as follows:
version: 2021-03-15
region: us-east-1 #specify your preferred default region
resources: []
Create the Developer Tools – GitHub connection
Creating a GitHub connection through AWS Developer Tools establishes a secure, OAuth-based link between your GitHub repository and AWS services. This connection enables CfCT to detect commits, safely access your configuration files, and trigger pipelines without exposing personal access tokens or storing credentials in plaintext.
The interesting work on the Connection comes when creating the app. Without the app, CfCT has no way to read the repo, thus the pipeline will fail.
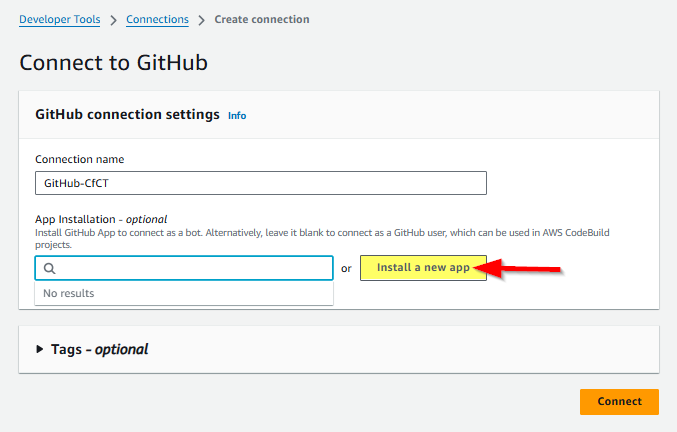
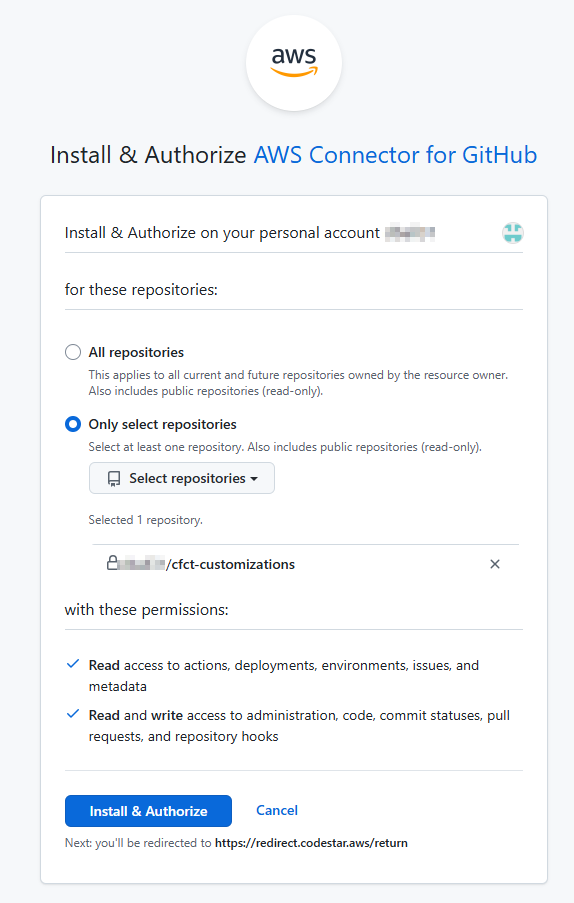
When you click Install a new app, you should be see an “Install & Authorize AWS Connector for GitHub” pop-up like the one shown below. To limit the scope of the connection/app, select Only select repositories, and choose the repo that contains the CfCT configuration files. When you click Install & Authorize, the GitHub app now has what it needs to perform the OAuth handshake to securely exchange tokens with AWS. We don’t provide AWS a GitHub password, but through this connection, GitHub issues AWS a scoped token.
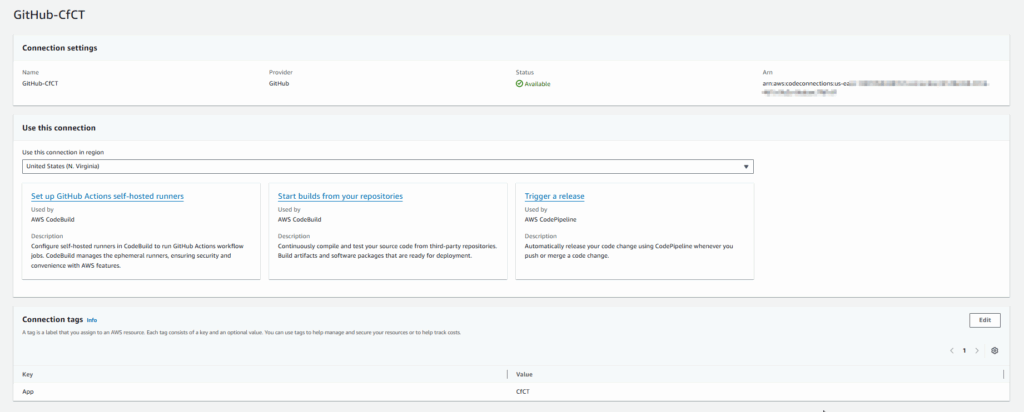
Everything is good once the Status of the connection changes to Available. Notate the ARN as it will be needed when deploying the CfCT CloudFormation stack.
Deploy the CfCT CloudFormation stack
With the GitHub repo and Code Connection setup, you’re ready to deploy the CfCT CloudFormation Stack. The AWS documentation says “download the template from GitHub” and then launch it using CloudFormation. After downloading the template, I uploaded it to an S3 bucket I created within the Management account, in Control Tower’s home region, and used its URL to launch the stack.
Let’s take a look at a few Parameters, starting with Pipeline Approval Stage. Should this be set to “Yes” or “No”? I don’t believe there is a universal right answer but like every good IT option, the best answer may be ‘it depends’ on your preferred workflow. Since I am using GitHub, I decided to use the PR process as my approval mechanism, thus I set the Pipeline Approval Stage to No. However you answer today, this option can be changed later by updating the stack.
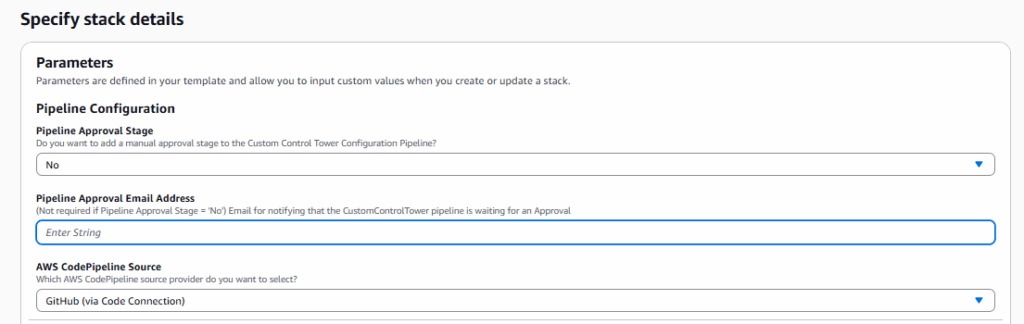
The GitHub Setup selections are probably self-explanatory, but paste in the ARN of the Code Connection created earlier and then enter your GitHub user/org, Repository Name, and then the Branch you wish to CfCT to monitor for changes. The template defaults to ‘main’, but the branch can be set to whatever you want.

Click when the Parameters are configured to your specifications, click Next to continue deploying the stack.
How do I know its working?
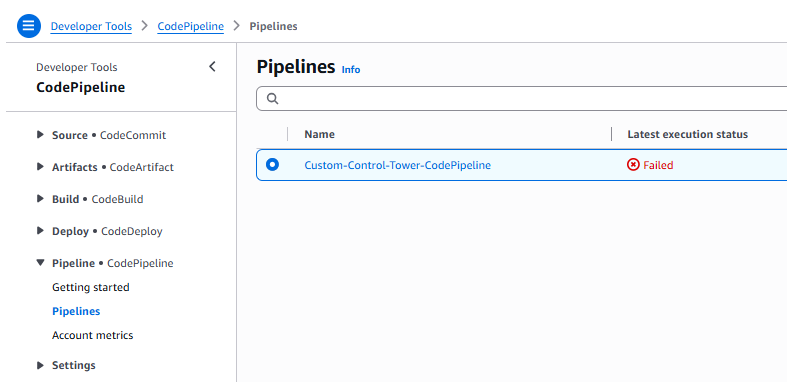
That’s a great question! When you deploy the CfCT CloudFormation stack, a successful stack creation is an important first milestone, but it doesn’t necessarily mean that CfCT is fully functional. CfCT is a pipeline-driven workflow, so you need to check the pipeline. After the stack deploys, the real confirmation comes from checking the CodePipeline execution that CfCT creates. In the AWS Console, open the CodePipeline service dashboard and verify CfCT’s pipeline pulled your source from GitHub, validated your configuration, and executed each stage without errors. When both the CloudFormation stack and the pipeline run succeed, that’s when you know CfCT is working as expected.
Don’t be discouraged if you experience a pipeline execution failure. It’s a normal part of working with CfCT. If you use CfCT for any length of time, the chances of experiencing a failure at some point is roughly 100%. It’s easy for me to say right now, but take a breath, review the pipeline logs, make the necessary adjustments, and you’ll get through it.
Here’s screenshot from the pipeline run before I had committed a valid manifest.yaml to the GitHub repo.
More to come…
With your GitHub repo in place, the Code Connection configured, and the CfCT stack deployed, you have completed the steps required to lay CfCT’s foundation. For the next post, I’m thinking I’ll dive into the pipeline validation tests and the GitHub workflow I added to help identify them before pipeline execution.
Until next time